


Table of contents
Introduction
This is the second part of the Django 4.0.4 Best Practices Tutorial Series, You can find the first part here Django 4.0.4 Best Practices Tutorial : Part 1
In this part we will learn the CRUD and static files by building a small project snacks_crud_project with those features:
- snacks app
- Snack model
- title field
- purchaser field
- description field
SnackListViewthat extends appropriate generic view associated url path is an empty stringSnackDetailViewthat extends appropriate generic view associated url path is<int:pk>/SnackCreateViewthat extends appropriate generic view associated url path iscreate/SnackUpdateViewthat extends appropriate generic view associated url path is<int:pk>/update/SnackDeleteViewthat extends appropriate generic view associated url path is<int:pk>/delete/urls to support all views, with appropriate names
templates support all views
navigation links in appropriate locations to access all pages
add Bootstrap, Bootstrap is an open source toolkit for developing with HTML, CSS, and JavaScript.
Django's architecture is based on MVT (Model View Template) and revolves around CRUD (Create, Retrieve, Update, and Delete) operations.
What is CRUD ?
CRUD is an acronym for performing Create, Retrieve, Update, and Delete operations on a table in a database.
When we are building APIs, we want our models to provide four basic types of functionality. The model must be able to Create, Retrieve, Update, and Delete resources. A model should have the ability to perform at most these four functions in order to be complete.
The CRUD paradigm is widely used in web application development because it provides a memorable framework for reminding developers how to build complete, useable models.
What is Static file ?
Static files are the CSS, JavaScripts, Fonts, Images, or any other resources we may use to compose the user interface. Django offers flexible techniques to induce these static files into the application. This flexible way of managing these static files will help to maintain the application performance better.The django.contrib.staticfiles application, which is already listed in the INSTALLED APPS -> setting.py, is responsible for maintaining the static files in Django.
Lets start coding ! For more theorical details about cratering the model , views and urls , also for how to create django project and app , you can check Django 4.0.4 Best Practices Tutorial : Part 1 . However , this example is created from scratch.
Coding the app
Create the model
model.py
from django.db import models
from django.contrib.auth import get_user_model
from django.urls import reverse

class Snack (models.Model):
    title = models.CharField(max_length=64)
    purchaser = models.ForeignKey(get_user_model(), on_delete=models.CASCADE)
    description = models.TextField()

    def __str__(self):
        return self.title


    def get_absolute_url(self):
        return reverse ('snack_detail' , kwargs= {"pk":self.pk})
When it comes to web development, hard coding paths in templates should be avoided at all . The reason for this is that paths may change, and it would be inconvenient to go through all of your HTML and templates and manually update every single URL or route. It makes it considerably more difficult to maintain your code.
The solution is to define functions that instead return the URL. This is when the get_absolute_url(self) function comes in handy.
admin.py
To register the model :
import django
from django.contrib import admin
from .models import Snack

admin.site.register(Snack)
Adding Bootstrap and JavaScript
Ensure static url
SETTINGS.py
STATIC_URL = '/static/'
Add STATIC_ROOT
STATIC_ROOT = BASE_DIR/'static'
After that and whenever you want to publish new versions of your static files run this command :
$ python manage.py collectstatic
The result will be :
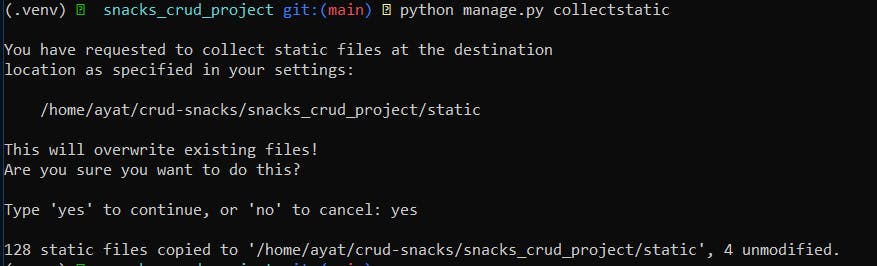
This command collects up all your static files from each of your app folders (including the static files for the admin app) and from any other folders you specify in settings.py, and copies them into STATIC_ROOT. Here since we doesn't yet add any static file , the 128 static files copied is for the admin app
Adding Bootstrap and JavaScript files
Bootstrap comes with a starter template that includes the basic files needed. Notably there are four that we incorporate:
Add the following css code in snacks_crud_project\static\snacks\css\bootstrap.min.css
Add the following js code in snacks_crud_project\static\snacks\css\bootstrap.min.js
Add the following js code in snacks_crud_project\static\snacks\css\jquery.js
Add the following js code in snacks_crud_project\static\snacks\css\popper.js
The tree of the directory should be like :
.
├── __init__.py
├── __pycache__
├── admin.py
├── apps.py
├── migrations
│   ├── 0001_initial.py
│   ├── __init__.py
│       ├── 0001_initial.cpython-39.pyc
├── models.py
├── static
│   └── snacks
│       ├── css
│       │   └── bootstrap.min.css
│       └── js
│           ├── bootstrap.min.js
│           ├── jquery.js
│           └── popper.js
├── tests.py
└── views.py
Migrations
$ python manage.py makemigrations
$ python manage.py migrate
views.py
Django offers built-in class-based generic views for CRUD operations so that you can easily perform CRUD operations using these views. Django generic views have been developed as shortcuts for common usage methods such as displaying object details , Create object and so on ...
They take some of the common methods found in view development and abstract them so that you can quickly write common views of data without writing too much code.
5 different Django class-based generic views
ListView: This class helps you to view the list of objects.CreateView: This class helps you to create new objects.DetailView: This class helps you to view the details of a particular object.UpdateView: This class helps you to update a particular object.DeleteView: This class helps you to delete a particular object.
from django.shortcuts import render
from .models import Snack
from django.views.generic import(
                                    ListView,
                                    DetailView,
                                    CreateView,
                                    UpdateView,
                                    DeleteView,
                                            )

class SnackListView(ListView):
    template_name = 'snack-list.html'
    model=Snack

class SnackDetailView(DetailView):
    template_name = 'snack-detail.html'
    model=Snack

class SnackCreateView(CreateView):
    template_name = 'snack-create.html'
    model=Snack
    fields  = '__all__'

class SnackUpdateView(UpdateView):
    template_name = 'snack-update.html'
    model=Snack
    fields = ['title' , 'description']

class SnackDeleteView(DeleteView):
    template_name = 'snack-delete.html'
    model=Snack
    success_url ='/'
In the create and update class-based view , when you specify a model to operate on, you must determine the fields you want to expose, and an optional success_url to redirect the user to, once the form has been successfully submitted. here we determined this path by get_absolute_url function that previously declared in the models.py.
success_url is given here to DeleteView class to give it a different path to redirect to.
urls.py
Add the url for the app in the project urlpatterns in the urls.py file
urlpatterns = [
    path('admin/', admin.site.urls),
    path('' , include('snacks.urls') )
]
Then in the app urls.py file :
from django.urls import path
from .views import (
                        SnackListView,
                        SnackDetailView,
                        SnackCreateView,
                        SnackUpdateView,
                        SnackDeleteView,
                                )

urlpatterns = [
    path('', SnackListView.as_view(), name ='snack_list'),
    path('<int:pk>/' , SnackDetailView.as_view(), name= 'snack_detail'),
    path('create/' , SnackCreateView.as_view() ,name= 'snack_create'),
    path('<int:pk>/update/' , SnackUpdateView.as_view() ,name= 'snack_update'),
    path('<int:pk>/delete/' , SnackDeleteView.as_view(),name='snack-delete')
]
Creating UI for Django Model
Template directory and template files
Firstly we create a Templates directory and configure it from setting.py in the TEMPLATES list
TEMPLATES list = {'DIRS' : [ BASE_DIR / 'templates']}
and create a separate file for each view class as well as the base file , the tree for the template directory will be like :
.
├── base.html
├── snack-create.html
├── snack-delete.html
├── snack-detail.html
├── snack-list.html
└── snack-update.html
Fortunately there’s Bootstrap in our life, the most popular framework for building responsive, mobile-first projects. Rather than write all our own CSS and JavaScript for common website layout features, we can instead rely on Bootstrap to do the heavy lifting. This means with only a small amount of code on our part we can quickly have great looking websites. And if we want to make custom changes as a project progresses, it’s easy to override Bootstrap where needed, too. When you want to focus on the functionality of a project and not the design, Bootstrap is a great choice. That’s why we’ll use it here.
To implement bootstrap, the following steps summarized the procedure to implement it.
Download the Bootstrap Visit the official site Bootstrap to download the bootstrap at local machine. It is a zip file, extract it and see it contains the two folder , css and js.
Create a Directory Create a directory with the name static inside the created app and place the css and jss folders inside it.
Create a Template First create a templates directory inside the app then create a
base.htmlfile to implement (link) the bootstrap css and js files.Load the Boostrap load the bootstrap files resides into the static folder in the
base.htmlfile. Use the following code.
{% load staticfiles %}
base.html
<!DOCTYPE html>
{% load static %}
<html lang="en">
<head>
    <meta charset="UTF-8">
    <title>CRUD Operations</title>
    <link rel="stylesheet" href="{% static 'snacks/css/bootstrap.min.css' %}">
</head>
<body>
<div class="container mt-5">
    <h2 class="text-center alert alert-danger">Snack CRUD</h2>

    {% block content %}
    {% endblock content %}
</div>


<script src="{% static 'snacks/js/jquery.js' %}"></script>
<script src="{% static 'snacks/js/popper.js' %}"></script>
<script src="{% static 'snacks/js/bootstrap.js' %}"></script>

</body>
</html>
You can find the code for each views here : List View , Detail View , Create View , Delete View and Update View.
The focus of this series is on learning Django not HTML, CSS, and Bootstrap. A separate series will be done for HTML, CSS, and Bootstrap after the end of this one.
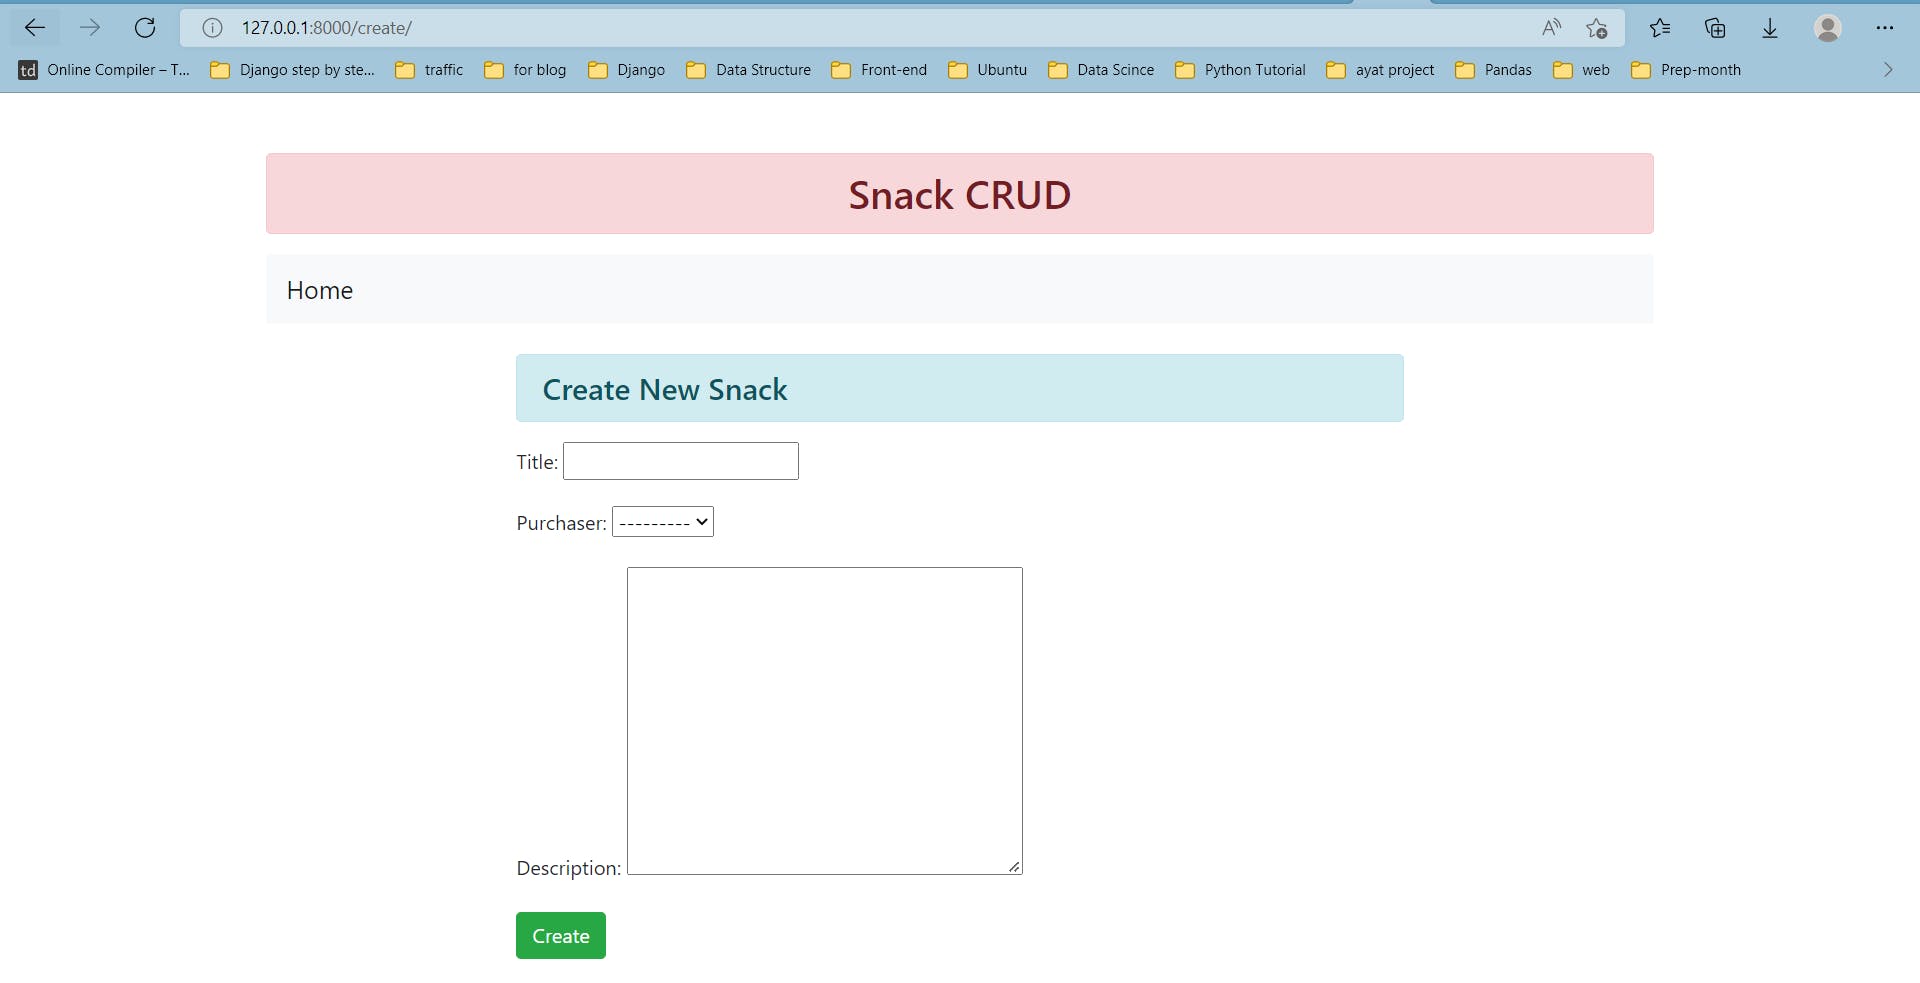
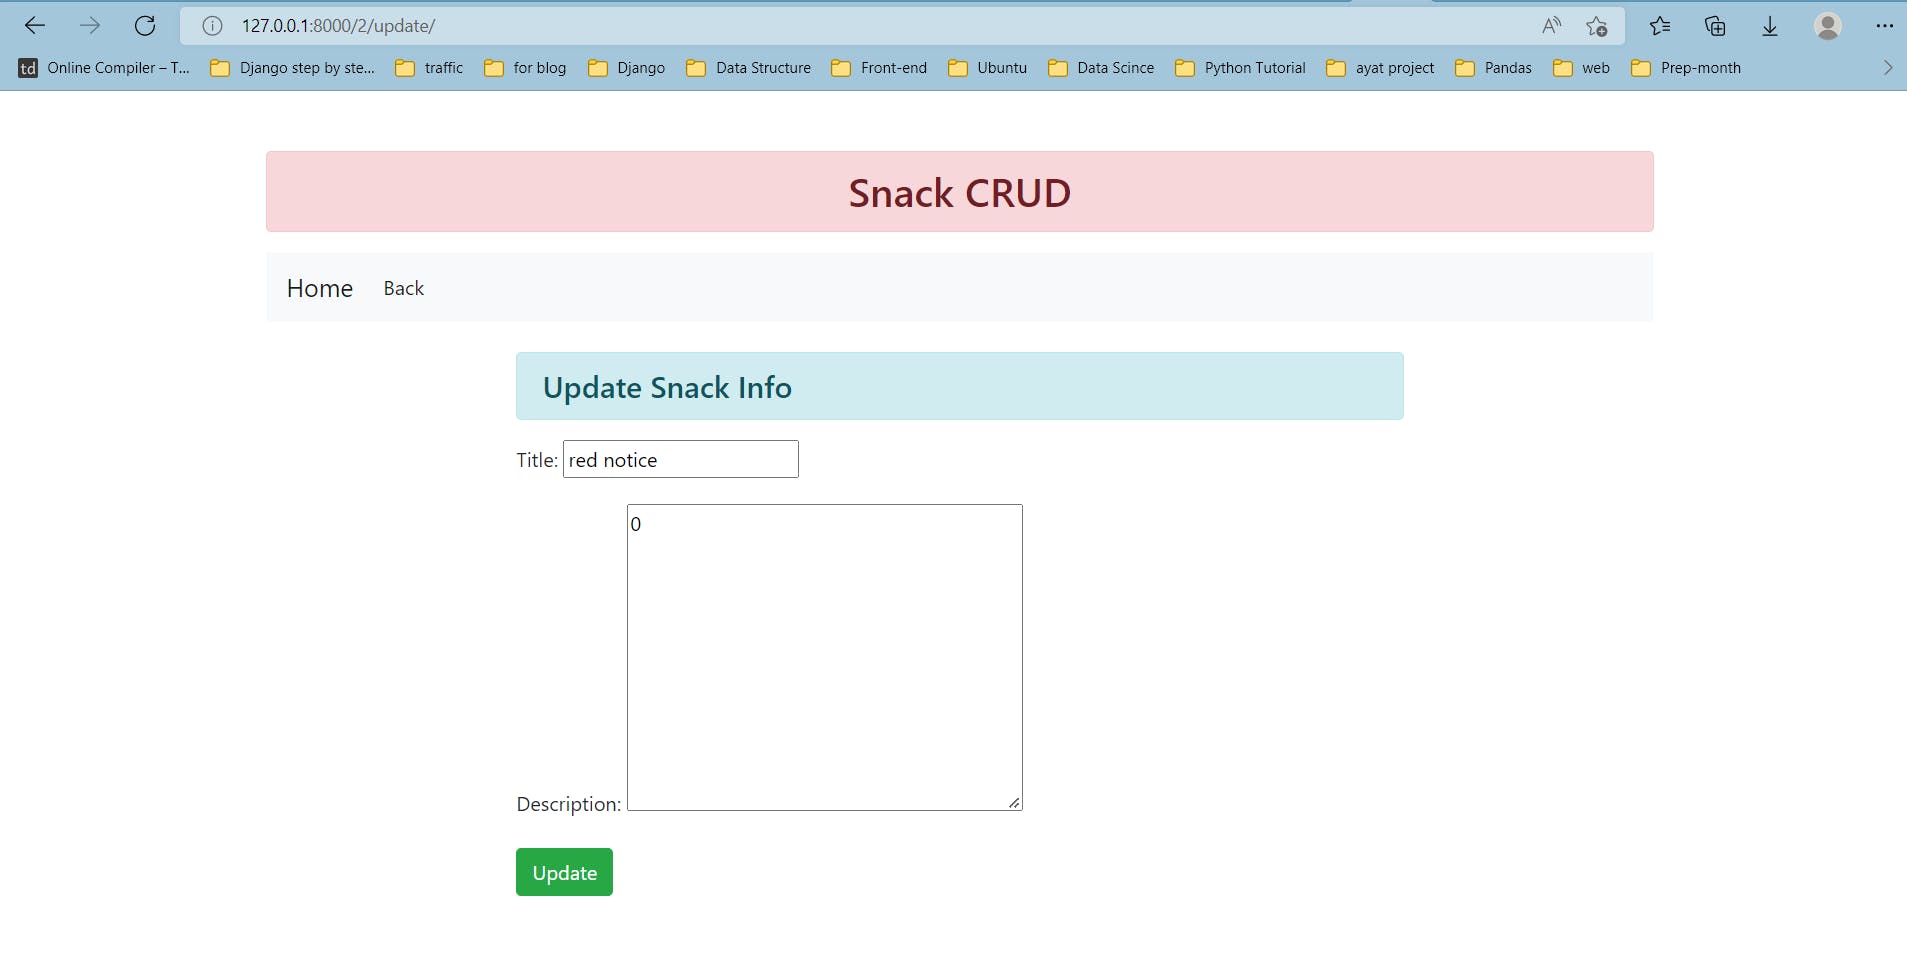
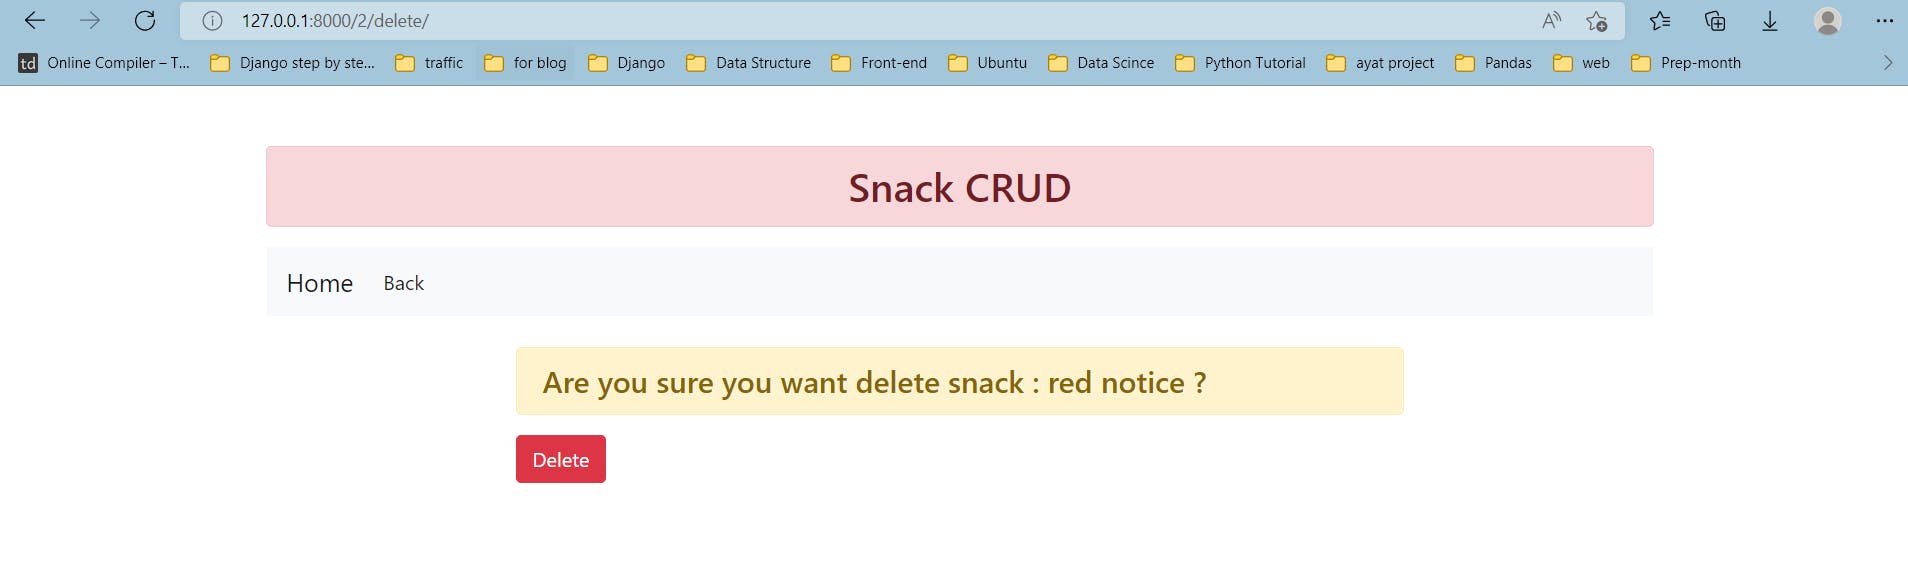
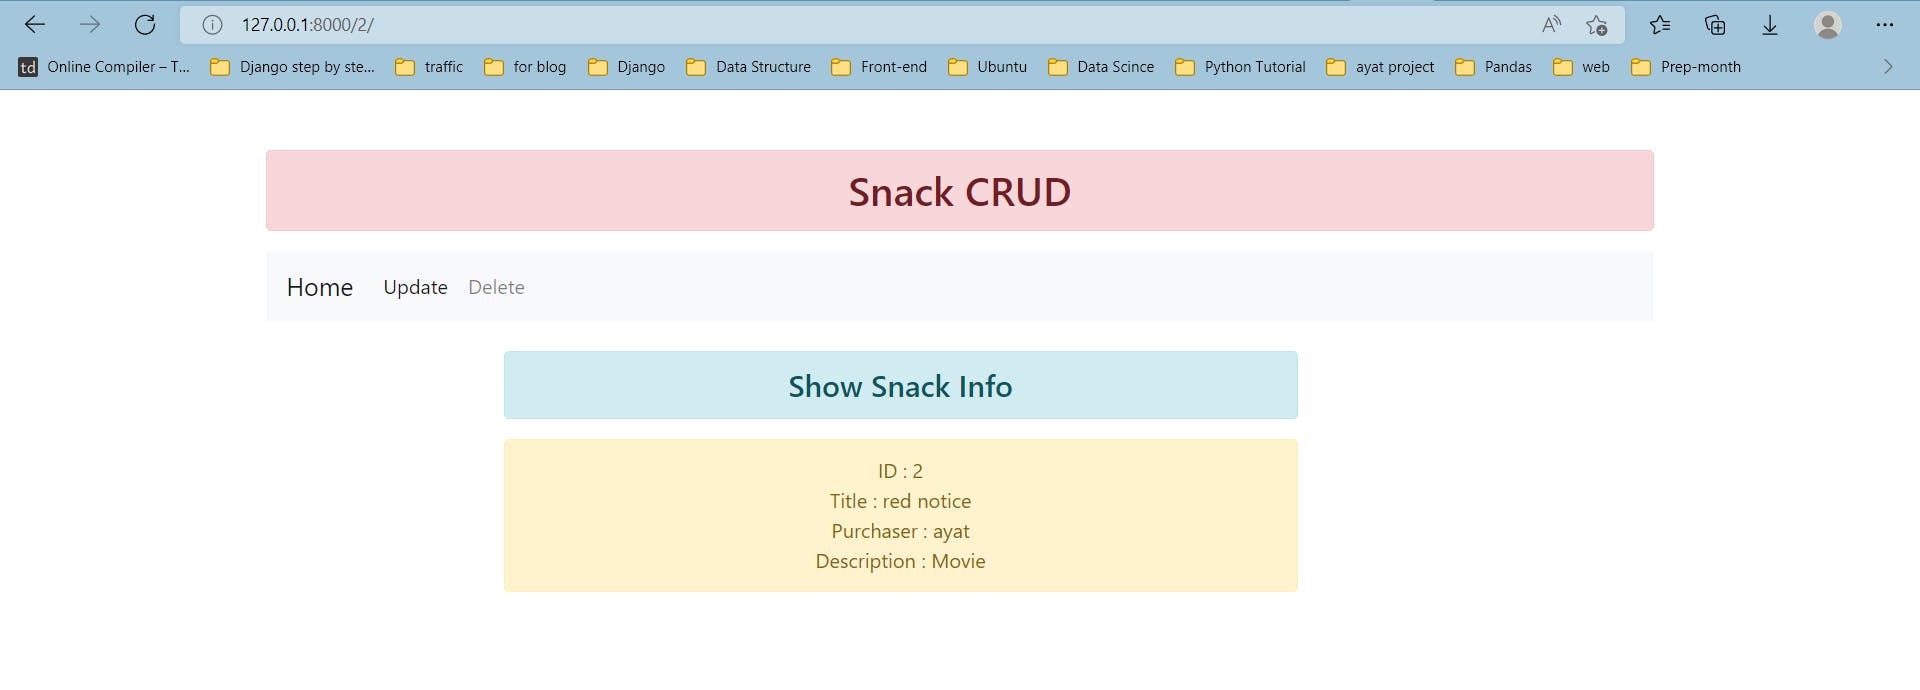
The final look of the CRUD app will be like :
- Home /
SnackListView:

- Detail View/
SnackDetailView:

- Create View /
SnackCreateView:
- Update View /
SnackUpdateView:
- Delete View /
SnackDeleteView:
- After the creation of new object or updating an existing one :
Source Code
github.com/ayat93a/crud-snacks